4 Easy Steps to Add a 24/7 AI Chatbot to Your Website
Imagine an AI Assistant on Your Website That Knows Everything About Your Business
Ever wished you could have a tireless, knowledgeable assistant on your website, ready to chat with visitors 24/7? Picture this: an AI chatbot that not only answers customer queries just like a human but also provides real-time information about product availability, order status, expected delivery times, and so much more. Sounds almost magical, right? Well, it’s not magic; it’s technology, and the best part is, it’s neither complex nor expensive. Intrigued? Keep reading, as I guide you through a simple, step-by-step process to integrate such an AI chatbot into your website.
In this article, we will cover:
- Creating an account on Tidio
- Setting up your AI chatbot
- Adding the chatbot to your WordPress website
- Training your chatbot to answer questions accurately
By the end of this guide, not only will you have a smart assistant on your site, but you’ll also see how easy it is to train it and customize it to suit your needs. So, let’s dive in and make your website smarter and more efficient, one step at a time.
Ready to get started? Let’s move on to the first step: creating your Tidio account.
Step 1: Creating an Account on Tidio
To kick things off, we need to create an account on Tidio. Follow these steps to get started:
- Click the link in the description, which will take you to the Tidio website.
- Click the “Get Started” button.
- Enter your email address and set a password.
- Enter your website’s URL where you want to add the chatbot. If you don’t have a website, you can watch a tutorial to create one in under 10 minutes.
- Agree to the terms and click “Get Started.”
- Fill in the required details and click “Next.”
- Select “LRO,” the AI support agent, and click “Let’s Go.”
Congratulations! You have successfully created an account on Tidio and landed on your dashboard. Now, let’s move on to setting up the chatbot.
Step 2: Setting Up Your AI Chatbot
Here’s how you can customize and set up your AI chatbot:
- Scroll down on the Tidio dashboard and click on the chatbot setup option.
- Customize the widget’s appearance by giving it a name and uploading a picture. For example, you can name it “Rachel”.
- You can also change the color scheme to match your website’s look and feel. Once you’re satisfied, click “Continue.”
- Select your platform (in this case, WordPress). Don’t worry if you use a different platform; Tidio provides step-by-step instructions for various platforms.
With the chatbot set up, it’s time to integrate it into your website. Let’s move on to the next step.
Step 3: Adding the Chatbot to Your WordPress Website
To make the chatbot functional on your website, follow these steps:
- Go to your WordPress dashboard.
- Navigate to “Plugins” and click on “Add New.”
- Search for “Tidio” and install the plugin, then click “Activate.”
- Connect your site with Tidio by logging into your Tidio account from the plugin settings.
- Select your project and click “Integrate Selected Project.”
- Approve the integration to let the chatbot display your products.
Once you’ve completed these steps, you should see the chatbot in action on the bottom right corner of your website. However, at this stage, it cannot yet answer specific questions. Let’s fix that by training the chatbot.
Step 4: Training Your AI Chatbot
Training your AI chatbot is easy. Just follow these steps:
- Go back to the Tidio tab, and click on “Set up LRO AI.”
- Click “Activate” and start adding your website links. The AI will learn from your website’s content.
- Enter the URLs of all critical pages on your site.
- Click “Upload” to start the training process. The status will change to “used” once training is complete.
- Activate your trained AI chatbot by clicking “Activate.”
Now your chatbot is trained and ready to interact with your visitors. Let’s test it by asking some questions.
Testing the Chatbot
Here’s how you can test if your chatbot responds correctly:
- Open your website and click on the chat icon.
- Send a message and see how the chatbot responds. For example, you can ask if any hoodies are available in medium size. The chatbot should list the products and provide relevant links.
- If the chatbot cannot answer a question, it will prompt the visitor to chat with a real person.
Chatting with Visitors via Mobile App
You can also chat with your visitors using the Tidio mobile app:
- Download the Tidio app from the Play Store or App Store.
- Open the app, grant permissions, and log in using your Tidio account.
Now you can reply to your visitors from anywhere at any time.
Training the Chatbot to Answer FAQs
If you notice that many visitors ask the same questions, you can train your chatbot to answer these FAQs:
- Go to your Tidio panel and click on the LRO icon.
- Click on “Data Sources,” then “Add Manually.”
- Enter the question and the corresponding answer, then click “Save.”
Keep adding more FAQs to better equip your chatbot in handling common queries.
Removing Tidio Branding
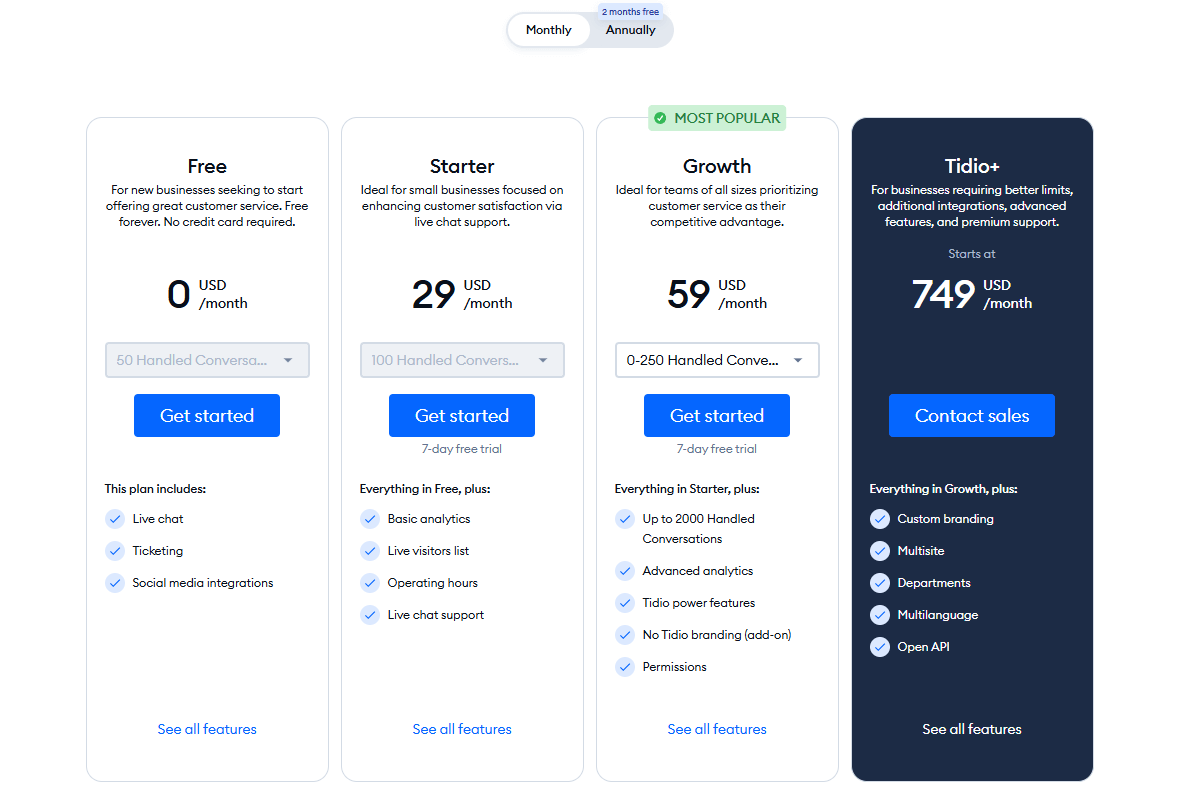
To remove the Tidio branding from your chatbot, you need to upgrade your plan:
- Go back to the Tidio panel and click “Upgrade” on the top right corner.
- Choose the LRO AI agent plan that suits your needs.
- If you use the link provided, you can get a 20% discount on the total price.
With the upgraded plan, you also get additional features like more than 50 AI replies, email, and live chat support, and the option to add your own branding.
Pricing
And there you have it! You’ve just added a powerful and responsive AI chatbot to your website, enhancing user experience and support significantly.
Imagine having an AI-powered assistant on your website that knows everything about your business, chatting with visitors just like a real person. From answering questions to managing orders, this AI chatbot can operate 24/7, providing instant replies without you lifting a finger. Contrary to common fears, adding this chatbot is neither complex nor costly. By following the simple steps outlined here, you can easily integrate this transformative technology into your site.
So, what are you waiting for? Dive in and bring your website to the next level with an AI chatbot!